Study/AI
[LangGraph] 전체 내용 훑어보기
728x90
반응형
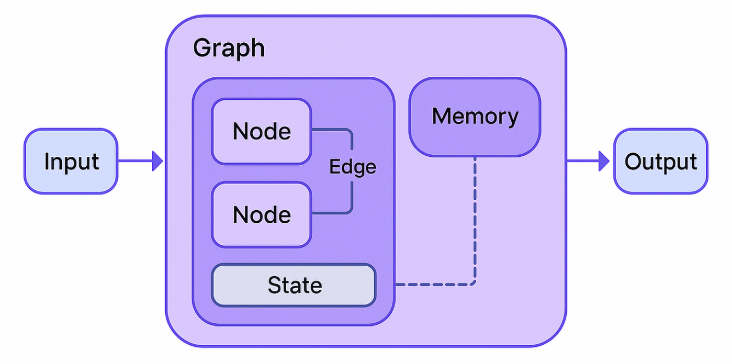
LangChain과 LangGraph의 차이점

- LangChain은 간단한 LLM 어플리케이션이나 RAG시스템 구축하는데 주로 사용, 빠른 개발
- LangGraph는 복잡한 AI 시스템이나 multi agent 시스템을 구축하는데 적합
- LangGraph는 노드와 엣지로 구성된 유연한 워크플로우를 만들수 있음, 여러 단계의 노드를 조건부, 병렬로 처리할 수 있다.
- LangChain 더 알아보기 -> https://hongs-coding.tistory.com/272
[LangChain] LangChain이란
유데미 - 챗GPT를 넘어서! 랭체인(LangChain)과 RAG로 만드는 AI 문서 Q&A 챗봇 Cource Study LangChain이란정의LLM(거대 언어 모델)을 단순 Q & A를 넘어서 실제 서비스/어플리케이션에 통합할 수 있게 해주는
hongs-coding.tistory.com
LangGraph 구성요소
- State
- Node
- Edge
State(상태) -> 노드에서 State를 사용
class BasicState(TypedDict):
    user_input: str
    ai_response: str
conversation_history: Annotated[list[str], add]- 노드들은 state를 통해 데이터를 주고 받는다.
- 기본스키마(Single Schema, 입력과 출력이 동일)
- 명시적 입출력 스키마(Explicit Input/Output Schema, 입력과 출력 별도로 정의)가 있음
- 다중 스키마 (Multiple Schema, 내부 노드 간 통신을 위한 private 스키마를 포함하는 복잡한 구조)
- Reducer(리듀서) 상태 업데이트 로직을 정의. 각 노드가 반환하는 업데이트를 기존 상태에 어떻게 적용할지 결정함
왜 리듀서가 필요한가?

여러 노드가 동시에 또는 순차적으로 실행될 때, 각 노드의 출력을 상태에 통합하는 방법이 필요합니다
단순히 덮어쓰기만 하면 이전 정보가 손실될 수 있습니다
리듀서를 통해 누적, 병합, 최대값 유지 등 다양한 업데이트 전략을 구현할 수 있습니다
Node(노드) -> 실행할 함수의 단위
# node
def chatbot_node(state: BasicState) -> BasicState:
    response = f"사용자님이 '{state['user_input']}'라고 하셨군요!"
    return {
        "ai_response": response,
        "conversation_history": [f"User {state['user_input']}", f"AI: {response}"],
    }

# LangGraph 생성
graph = StateGraph(BasicState)
# graph에 node 등록
graph.add_node("chat", chatbot_node)
- 현재 state를 입력으로 받아 처리
- 각 노드는 독립적으로 실행
- 여러 노드를 연결하여 복잡한 워크플로우 구성
- 책임:
- 데이터 변환 및 처리, 데이터 검증
- 상태 관리
- 흐름 제어, 조건부 로직을 통해 다음에 실행될 노드를 결정하거나 특정 조건에서 그래프 실행 종료
- 각 노드별로 필요에 따라 병렬처리나 캐싱을 적용할 수 있다.
- 동기노드, 비동기 노드
- RunnableConfig로 런타임에 노드의 동작을 조정 가능
- 데코레이터 패턴 노드(@wraps(func)) 얘도 Spring의 AOP같은게 있음
Edge(엣지) -> flow 정의
# langGraph 생성
workflow = StateGraph(WorkflowState)
# step1, step2, step3은 node 함수
# node 등록
workflow.add_node("step1", step1)
workflow.add_node("step2", step2)
workflow.add_node("step3", step3)

workflow.add_edge(START, "step1")    # 1. 시작 -> step1
workflow.add_edge("step1", "step2")  # 2. step1 -> step2
workflow.add_edge("step2", "step3")  # 3. step2 -> step3
workflow.add_edge("step3", END)      # 4. step3 -> 종료
app = graph.compile()
result = app.invoke({"user_input": "안녕하세요 나는 누구에요"})


# 조건부 엣지 (Conditional Edge)
graph.add_conditional_edges(
    "decision_node",
    routing_function,
    {
        "option_a": "node_a",
        "option_b": "node_b"
    }
)
- 방향성: 한 노드에서 다른 노드로의 단방향 연결
- 상태 전달: 노드 간 상태 정보 전달
- 흐름 제어: 실행 순서와 조건 결정
- 병렬 실행: 여러 엣지가 동시에 활성화 가능
흐름제어
- 조건부 분기를 통해 런타임 상황에 따라 다른 실행 경로를 선택할 수 있게한다.
- 조건부 엣지의 핵심은 라우팅 함수
- 라우팅 함수는 현재 상태를 분석하여 다음에 실행할 노드를 결정하는 로직
from typing import Literal

class ControlFlowState(TypedDict):
    value: int
    path_taken: str
    result: str

def evaluate(state: ControlFlowState) -> dict:
    """값을 평가하는 노드"""
    value = state["value"]

    if value > 100:
        path = "high"
    elif value > 50:
        path = "medium"
    else:
        path = "low"

    return {
        "path_taken": path,
        "result": f"Value {value} is {path}"
    }

def handle_high(state: ControlFlowState) -> dict:
    """높은 값 처리"""
    return {"result": f"HIGH: Special handling for {state['value']}"}

def handle_medium(state: ControlFlowState) -> dict:
    """중간 값 처리"""
    return {"result": f"MEDIUM: Standard handling for {state['value']}"}

def handle_low(state: ControlFlowState) -> dict:
    """낮은 값 처리"""
    return {"result": f"LOW: Basic handling for {state['value']}"}

# 라우팅 함수
def route_by_value(state: ControlFlowState) -> Literal["high", "medium", "low"]:
    """상태에 따라 경로 결정"""
    return state["path_taken"]

# 그래프 구성
control_graph = StateGraph(ControlFlowState)
control_graph.add_node("evaluate", evaluate)
control_graph.add_node("handle_high", handle_high)
control_graph.add_node("handle_medium", handle_medium)
control_graph.add_node("handle_low", handle_low)

# 조건부 엣지로 흐름 제어
control_graph.add_edge(START, "evaluate")
control_graph.add_conditional_edges(
    "evaluate",
    route_by_value,
    {
        "high": "handle_high",
        "medium": "handle_medium",
        "low": "handle_low"
    }
)
control_graph.add_edge("handle_high", END)
control_graph.add_edge("handle_medium", END)
control_graph.add_edge("handle_low", END)
Command를 활용한 엣지 제어
- Command는 LangGraph에서 "다음에 어디로 갈지"와 "상태를 어떻게 바꿀지"를 한 번에 결정할 수 있는 기능
- 복잡한 비즈니스 로직을 보다 쉽고 효율적으로 구현할 수 있는 핵심 도구
- Command의 핵심 기능:
- goto: 다음에 실행할 노드 지정
- update: 상태 업데이트
Command를 사용하면 좋은 경우:
다음 단계로 가면서 동시에 여러 상태를 업데이트해야 할 때
재시도나 복구 로직이 복잡한 경우
동적으로 조건을 판단하여 다른 경로로 보내야 할 때
비즈니스 로직이 복잡하고 여러 요소를 동시에 고려해야 할 때

조건부 엣지를 사용하면 좋은 경우:
간단한 분기만 필요한 경우
라우팅 로직과 비즈니스 로직을 명확히 분리하고 싶은 경우
여러 노드로 병렬 실행이 필요한 경우
def check_inventory(state: OrderState) -> Command[Literal["process_payment", "out_of_stock", END]]:
    """재고 확인 후 다음 단계 결정"""
    item = state["item"]
    quantity = state["quantity"]

    # 간단한 재고 확인 (실제로는 DB 조회)
    available_stock = {"사과": 10, "바나나": 5, "오렌지": 0}
    stock = available_stock.get(item, 0)

    if stock >= quantity:
        # 재고 충분 - 결제 처리로 이동
        return Command(
            goto="process_payment",
            update={
                "status": "재고 확인 완료",
                "messages": state["messages"] + [f"{item} {quantity}개 재고 확인됨"]
            }
        )
    else:
        # 재고 부족 - 품절 처리로 이동
        return Command(
            goto="out_of_stock",
            update={
                "status": "재고 부족",
                "messages": state["messages"] + [f"{item} 재고 부족 (요청: {quantity}개, 보유: {stock}개)"]
            }
        )


# check_inventory 노드 시작
order_graph.add_edge(START, "check_inventory")
order_app = order_graph.compile()
그래프 실행방법
- 동기 실행: invoke 메서드
- 블로킹 방식으로 동작하여 전체 워크플로우가 완료될 때까지 호출 스레드가 대기
- 반환값은 그래프의 최종 상태를 담은 딕셔너리로, 모든 노드의 실행이 완료된 후의 결과
- 중간 실행 과정은 노출되지 않으며, 오직 최종 결과만 반환되어 결정론적 실행을 보장
- 단순한 배치 처리나 테스트 환경에서 주로 사용
- 스트리밍 실행: stream 메서드
- 스트리밍 실행은 그래프의 각 노드 실행 결과를 실시간으로 반환하는 방식
- 각 chunk는 {node_name: node_output} 형태의 딕셔너리로 구성
- 웹 애플리케이션에서 실시간 응답을 구현할 때 유용합니다.
- 메모리 효율적인 이터레이션을 제공하며, 대용량 그래프에서도 안정적으로 동작
for chunk in app.stream({"counter": 0, "messages": []}):
print(f"청크: {chunk}")
# 각 노드 실행 완료 시마다 결과 수신
- 비동기 실행
- 비동기 노드 정의
- async def로 정의된 노드는 코루틴 객체를 반환하여 비동기 실행을 지원
import asyncio

async def async_execution():
    """비동기 그래프 실행 데모"""

    # 비동기 노드 정의
    async def async_node(state: MyState) -> dict:
        await asyncio.sleep(0.1)  # I/O 작업 시뮬레이션
        return {"counter": state["counter"] + 1}

    # 그래프 구성
    async_graph = StateGraph(MyState)
    async_graph.add_node("async_node", async_node)
    async_graph.add_edge(START, "async_node")
    async_graph.add_edge("async_node", END)

    # 컴파일
    async_app = async_graph.compile()
- async def로 정의된 노드는 코루틴 객체를 반환하여 비동기 실행을 지원
- 단일 비동기 실행
- ainvoke()는 invoke()의 비동기 버전으로 코루틴을 반환
- await 키워드는 현재 코루틴을 일시 중단하지만 이벤트 루프는 계속 실행
# 비동기 실행
result = await async_app.ainvoke({"counter": 0})
print(f"비동기 실행 결과: {result}")
- 병렬 실행
- asyncio.gather()는 여러 코루틴을 동시에 실행하여 전체 처리 시간을 단축
- asyncio.run()은 이벤트 루프를 생성하고 관리하는 진입점
# 다중 그래프 병렬 실행
results = await asyncio.gather(
  async_app.ainvoke({"counter": 0}),
  async_app.ainvoke({"counter": 10}),
  async_app.ainvoke({"counter": 20})
)
print(f"병렬 실행 결과: {results}")

# 실행
asyncio.run(async_execution())
실행 방법별 특성 비교
- 성능 특성
- invoke: 순차 실행으로 예측 가능한 성능, 단순한 디버깅
- stream: 실시간 응답성 확보, 약간의 오버헤드 발생
- async: I/O 집약적 작업에서 뛰어난 처리량, 복잡한 에러 처리 필요
- 메모리
- invoke: 전체 상태를 메모리에 보관하는 버퍼링 방식
- stream: 부분적 상태만 유지하는 효율적 메모리 사용
- async: 코루틴 스택 최적화를 통한 낮은 메모리 오버헤드
- 실행 방법 선택 기준
- invoke
- 배치 처리 시스템의 완전한 결과 처리
- 단순한 API 엔드포인트의 요청-응답 패턴
- 개발 및 테스트 환경에서의 디버깅 작업
- stream
- 웹 인터페이스의 실시간 사용자 피드백
- 장시간 실행 작업의 진행 상황 모니터링
- 대화형 AI 시스템의 점진적 응답 생성
- async
- 높은 동시성이 요구되는 서버 환경
- 외부 API 호출이 많은 I/O 집약적 워크플로우
- 마이크로서비스 아키텍처의 비동기 통신
- invoke
728x90
반응형
'Study > AI' 카테고리의 다른 글
| [Claude] Claude Code Tips (0) | 2026.02.12 |
|---|---|
| [LangChain] Hub와 RAG실습 (5) | 2025.08.24 |
| [LangChain] MultiQueryRetriever, 사용자 질문 확장하기 (0) | 2025.08.24 |
| [LangChain] 검색기, Retriever의 search_type, search_kwargs 알아보기 (0) | 2025.08.24 |
| [LangChain] 검색기, Retriever 개념. similarity_search와 차이점 (0) | 2025.08.24 |
댓글